Friday, June 17, 2011

New Set of Color Actions

I have finally finished my new Color Actions. I really love how they turned out. The action set is called Candy Shop Color Me Actions.

These are the actions included

1. Skittles Me Timber
2. Sweet Tastes of Honey
3. Minty Green
4. Laffy Taffy
5. Just Another Vintage

I have also added a defoger action to this set also and they are all fully adjustable.


Here is the link to the new actions

Candy Shop Color Me Actions

Monday, December 20, 2010

Free Photoshop Actions

Hello Everyone,

I am a mother of 3 wonderful kids and love to take photo's of them on a daily bases. I love to edit them in photoshop and thought I would share with all of you my free actions that I use on my photo's. I've created them so that they are easily adjustable. They are easy to use and will come with instructions so that even the newbies with actions will no how to use them. The actions were created for both photoshop and for elements. I will let you know if they cant be used in elements.

Hope everyone's likes and please if you do use my actions and like them give me credit so other's can come here and use them also. Thanks and enjoy.

Photoshop Actions that I have created so far:

Ice cream Color Set

Candy Shop Tasty Treats


Candy Shop Muted Colors

Friday, October 16, 2009

Digital Photo Pros Forum

Hello All,

I recently found an awesome photo website forum that i thought other should go and check out. Here is the link Digital Photo Pros. All you have to do is register (which is free). Make sure to put my name Michille Baker in the referee box because each month they give away about $2000 dollars worth of prizes to the person who refers the most. They also hold photo contests that also give away lots of prizes. Anyways check it out you wont be unhappy lots to see and also lots to learn.

Friday, February 13, 2009

Photography Poses

Below is a list of photography poses along with some great websites that will help you with posing. My favorite is the first one and I actual have it printed and laminated just in case i ever need it. I hope these will come in useful for you.


http://www.digital-savant.com/PosingGuide.pdf

http://lumitouch.com/benstudiotutorial/index.html

http://jzportraits.home.att.net/

http://www.modelposing.net/index.php

http://super.nova.org/PhotoClass/

http://www.stnphotography.com/proassist/tips.html

http://polisphotography.com/Document...web/posing.pdf

Tuesday, February 10, 2009

3 minute Photoshop Elements 7 Eye Pop Tutorial

Photoshop Elements Tutorial

Before we begin i will need you to download & install this wonderful mask action by reta. This mask action can be found here. For directions on how to install the actions click here.

Reta also makes some wonderful actions that are compatible with both elements and photoshop cs2&3 so once you've learned how to use them go back to her site and check them out. I also have some actions on my blog but they are only compatible with cs3. I will evenly make some fore elements.

1. Open the photo you would like to edit and then duplicate the background layer by clicking ctrl +J. You can also duplicate a layer by opening the layer's pallet and then clicking on layer - duplicate layer

You should now see 2 layers - a background layer and another layer named "layer 1"

2. Next, change the blending mode of layer 1 to screen. This can be done in the layers pallet and selecting the down arrow next to the word normal and scrolling down to the word screen.

Step 2

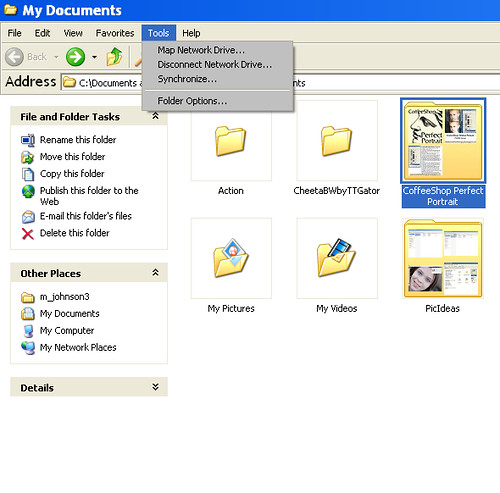
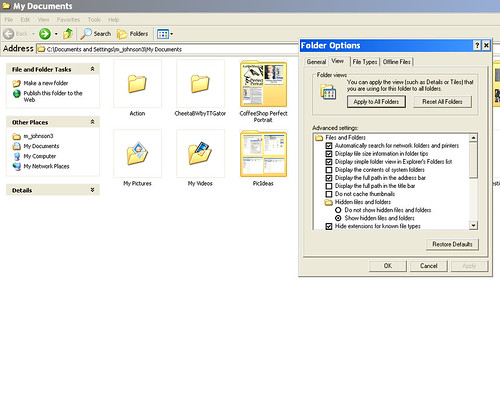
3. Next you will need the action you just installed. If you haven't downloaded & installed it already then please do so now.

In this step we will creating a mask which will allow you to mask out only part of the image that you want to be seen.

1st you will need to select the "layer 1" layer and then open up your effects pallet and locate the action that you just installed. It should have an icon that says something like "CoffeeShop Layer Mask" if you can't find it you may not have installed correctly. If this is the case repeat the installation instructions and try again. If you do see the icon then select the action and click on apply button at the bottom of the effects palette. The action will add a layered mask to the "Layer 1" layer. Like shown in the picture below.

3a
3265371836_6bc1a69d9d

4th - Next, grab your paint bucket which can be found in your tools pallet and then change the foreground color to white. See 4a pic below.

4a
3265371836_089c34579d_o1

5th - Next, make sure that your mask layer is selected (see 5a pic below) and then with your paint bucket click on you photo. This should now fill you mask layer black and will also make your picture go back to what it looked like before you changed your blending mode to screen (see pic 5b below)

5a
3265371836_6bc1a69d9d

5b
Step 4

6th - Now, grab your paint brush which is located in the tools pallet (see 5a above) and with your masked layer selected and your foreground color still set to white, color over the iris parts of the the eye's. You will need to make sure the size of your brush is not any larger than the iris part of the eye. To do this check the pixels size using the brush option menu which is usually located under the main bar. see pic 6a below

6a
pa_01

Note: If you paint outside the iris part of the eye then you can set the foreground color
black and use your brush to paint back what you didn't want to paint over. Also if you want you can paint over the white of the eyes with a very low opacity brush. To do this just change the opacity of the brush to about 20%.

7. Once you have done that you will need to lower the opacity of "Layer 1" so that the eye's look more realistic. Lower the opacity to your taste. To do this just move the opacity slider of "Layer 1" to the left from the layer's pallet.

8. Okay once you have completed that you will need to flatten your image. To do this go to your menu bar above layer - flatten image.

Step 5

8. Now that we have brightened up the iris part of the eye we will not sharpen the whole eye up using the high pass filter. First we will need to repeat steps 1 above to duplicate our layer.

9. Next, we will need to add a high pass filter to the "layer 1" layer.

To do this go to the menu bar above and select filter - other - high pass and set to about 8 pixels and click ok. Now change the high pass layer blending mode to soft light (see 9a below).

3265387078_d4b500f5c612

8. Next, you will need to repeat steps 4 thru 5 to create a layered mask for the "layer 1" layer

9. Next, once you have filled your mask layer black you will need to take your paint brush using the foreground color white and paint the whole eye's including the white's, pupil and iris. This will sharpen and define the eye.

Note: If once you've painted the eyes it they look over sharpened then you can just bring down the opacity in the layer pallet of "Layer 1"

10. Okay once you have completed that you will need to flatten your image. To do this go to your menu bar above layer - flatten image.

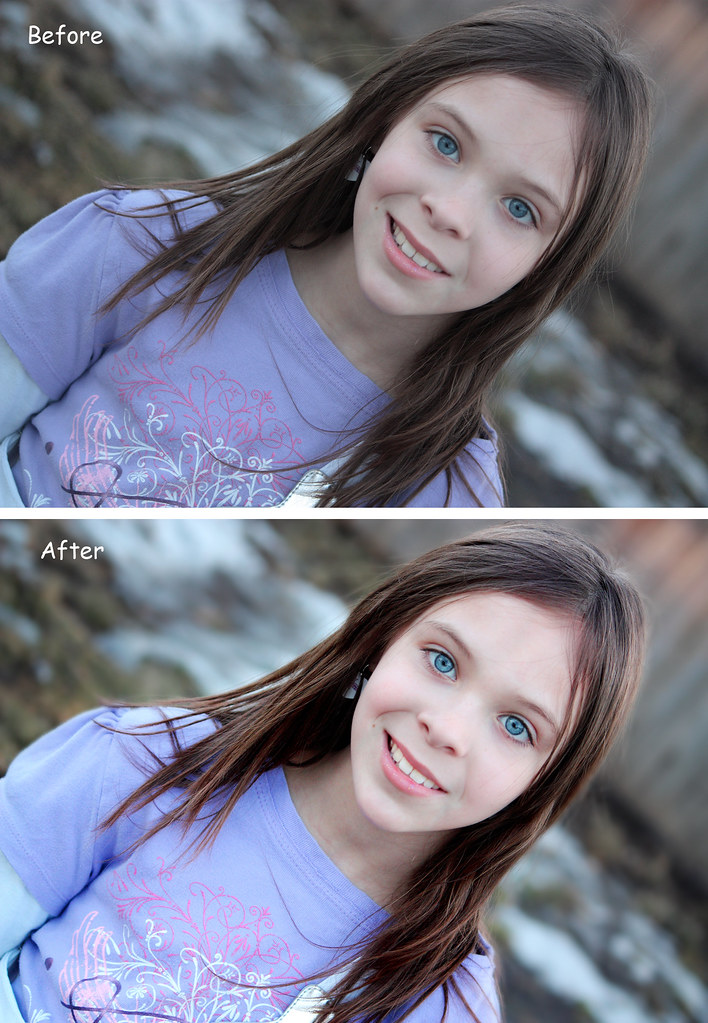
You should now have more defined eyes.

Here is a before and after adding

Beforeandaftereyepop

Monday, February 9, 2009

How to install actions in elements 7

Hello Everyone,

I am going to explain using a step by step tutorial for all of you newbies out there on how to install actions for photoshop elements 7.

1. Download the action you are wanting to load. Make sure to remember were you downloaded.

2. Next, find the file that you just download and if it needs to be unzipped then follow the instruction below to do so other why's go on to the next step.

Unzip Instructions:
a- Double click on the zipped folder that you would like to unzip

Step 1

b - Click on Extract All under the folder task

Step 2

c - Next, an extraction wizard dialog box will come up

Step 3

d - Click next then click on browse to select the destination were you would like to save the folder to.

Step 4

e - Now that you have chosen a location to save the file click next and make sure the
show extracted files has a check mark beside it.Then press finish.

Step 5

f - Next, it should bring up a window showing the folder that you just extracted.

Step 6

g - Next double click on the folder you just extracted.

Step 7

The unzipping of the file is complete continue on the loading the actions.

3. First before we even begin to load the actions we need to make sure that are folder options are set to view hidden files and folders.

How to show hidden files and folders

a- Go to Tools - Folder Options in the

Step 10

b - Folder options dialog box will appear. Select the view tab and
scroll down to hidden files and folders and make sure the show
hidden files and folders option is selected. Then click ok.

Step 11


4. Ok, now we can go one to copying the actions files and placing them in the correct directory. First we need to change the way we view the window so we can read what type of files are located in the folder that we just unzipped.

Step 8

5. Next, look under the type column and find the .png and the .atn file and select both of the like i did below. To select them all you have to do is select on then while holding down the ctrl button click on the other file.

Step 9

6. Next, after you have selected the to files you will need hold the ctrl button down and click on the letter c. This copy's the files so you can paste them into the location later.

7. Once, you have copied them you will then need to go and select on view - explorer bar - folders

step 12


8. Next, you should see some folders on the left hand side of your screen.

step 13

9. Next, go to this location C:\Documents and Settings\All Users\Application Data\Adobe\Photoshop Elements\7.0\Photo Creations\photo effects

10. Once you have the photo effects folder open then all you have to do is click on ctrl plus v and that will paste those 2 files into the photo effects folder.

You should now be done with installing the actions.

Next all you have to do is open up your photoshop elements 7 and locate the photo effects folder and the action you just installed should be located there. I hope this helps!

Thursday, February 5, 2009

2 Minute Photoshop cs3 Eye Pop Tutorial

Wow, what amazing thinks that can be done in photoshop. Every since I've started taking pictures and editing them I've been astonished with how much stuff photoshop can help improve your photo's. Today, i am going to show you how to pop the eye's out in photoshop so that your subject stands out. This can be done a million different ways but today i am only going to show you the way i do them. I have 2 tutorials one using photoshop cs3 and the other using photoshop elements 7 ( i am guessing can be used with any element versions).


Photoshop CS3 Eye Tutorial

Open the photo that you would like to edit. I will usually do all of my basic photoshop editing before editing the eyes but it's up to you.

1. Next, make sure your layers pallet is open. Duplicate the background layer by either typing ctrl +J or by dragging the background layer into the duplicate layer icon.

Step 1

2. Next, change the layer blending mode to screen.

3. Next, you will need to add a layered mask to the duplicate background layer by holding down alt + click on the add vector mask in the layers pallet. This step will unmask everything in your photo so it looks like it did before you changed the blending mode to screen.

4. Now select your paint brush from the tools menu and change the color of your brush to white so you can't paint back the areas that you want to be brightened up.

5. Next with the paint brush, paint colored areas of the eye leaving the white's of the eyes and everything else in the photo alone. If your not for sure what i mean check out my pic below. Right now it may look a little funny but trust me it will look better in a minute we will adjust the opacity when we are done.

Step 5

6. Okay next what we will need to do is brighten up the white's in the eyes using the same masked layer as we did in step 5. With your brush still selected change the brushes opacity to about 30% and brighten up the white in the eye's. See the picture below if your not for sure what i am talking about.

Tip: If you end up going outside the intended area that you wanted then just set your brush color back to black and mask the area back out.

7. Once you have completed brightening the eye up you will need to bring the opacity down to the desired look so that the eye doesn't look to fake. I used 40% but it's up to you and what your photo looks like. Also do keep in mind that when we sharpen the eyes in the later steps it will also brighten the eye's up.

Step 7

8. Once you have done that flatten the image and then duplicate the background layer again.

9. Next we will be sharpening the image. To do this make sure you are working on the duplicate background layer. Go to filter - other - highpass sharpening - use 6 pixels and click ok - change the layer blending mode to soft light.

10. Next, you will need to add a layered mask to the duplicate background layer again by holding down alt + click on the add vector mask in the layers pallet. Click on your paint brush tool if it's still not selected already and change the color to white.

11. Now you will paint in all of the eye and if you want you can even sharpen up the eyelashes a little also. If you sharpen the eye lashes use a change your opacity of your brush to about 40%.

12. Next when that's complete flatten your image and your done.
Untitled-1